
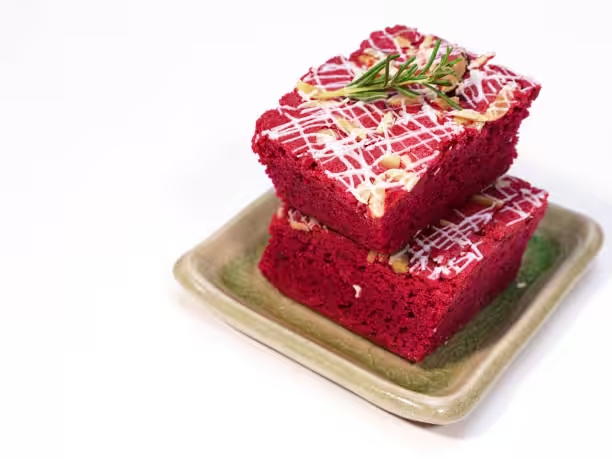
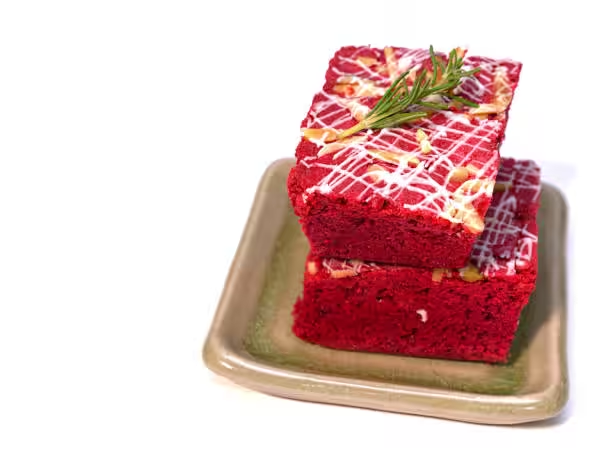
One rainy afternoon i decided to bake something sweet and ended up with red velvet brownies. They is kinda like regular brownies but with this crazy red color and a little tang from buttermilk. Its not just about looks, each bite has cocoa, vanilla and that slight buttery tang that makes you wanna go back for more.
Perfect for any day you wanna feel fancy or for special stuff like birthdays, these brownies bring both fun and flavor. Theyre super fudgy and a bit chewy at the same time, wich makes them a crowd pleaser every time.
What Are Red Velvet Brownies?
Red velvet brownies are a mashup of two fav desserts: the classic fudgy brownie and the famous red velvet cake. They is denser than cake but softer than normal brownies. You get a rich chocolate taste from cocoa powder and a tiny bit of tang from buttermilk. Plus there’s a hint of vanilla that brings it all together.
Unlike red velvet cake wich is light and airy thanks to cake flour and special mixing, these brownies use more butter and eggs for that chewy, fudgy feel. That makes them perfect for anybody who loves a gooey center and a slightly crisp edge.
History of Red Velvet Desserts
Red velvet desserts first popped up in the 1920s. Back then people noticed a cool color change when natural cocoa mixed with acidic ingredients like vinegar or buttermilk. The effect was subtle, so over time bakers started using red food coloring to get that bold hue. The cake became famous and people experimented by making cupcakes, cookies, and now brownies.
As years passed, red velvet got its own fan club and inspired lots of recipe twists. Today you see red velvet everything from muffins to ice cream. But red velvet brownies stand out because they combine nostalgia with a fudgy twist thats both fun to bake and fun to eat.
Why Choose Red Velvet Brownies?
Picking red velvet brownies is like choosing a party in your mouth. The bright red color instantly grabs peoples attention and makes any table look extra special. And the taste? Its a lovely balance of rich chocolate, tangy buttermilk, and sweet vanilla.
Theyre super versatile too. Serve them warm with ice cream for a cosy treat or wrap a few up as a gift. On Valentine’s Day or a chill movie night they fit right in. You can even add white chocolate chips or cream cheese frosting if you want to kick it up a notch.
Ingredients for Red Velvet Brownies
Youll need these basics to nail the perfect red velvet brownies:
- Cocoa powder: Gives that chocolatey base.
- Red food coloring: For the signature red color.
- All-purpose flour: Builds the brownie structure.
- Sugar: Sweetness and moisture.
- Eggs: Binds everything together.
- Butter: For a rich, fudgy feel.
- Vanilla extract: Adds depth to the flavour.
- Baking soda: Helps with a slight rise.
- Salt: Balances all the sweetness.
- Optional: White chocolate chips or cream cheese frosting for extra yum.
Detailed Recipe for Red Velvet Brownies
Ingredients
- 1 cup unsalted butter, melted
- 1 cup granulated sugar
- 2 large eggs
- 2 teaspoons vanilla extract
- 1 cup all-purpose flour
- ⅓ cup cocoa powder
- 1 teaspoon baking powder
- ½ teaspoon salt
- 1 tablespoon red food coloring
- Optional: extra white chocolate chips
Directions
- Preheat Oven: Heat oven to 350°F (175°C). Grease and line a 9x13 inch pan with parchment paper.
- Mix Wet Ingredients: In a big bowl whisk melted butter and sugar. Add eggs one at a time, mixing well. Stir in vanilla and red food coloring.
- Combine Dry Ingredients: In another bowl sift together flour, cocoa powder, baking powder and salt.
- Fold Together: Slowly add dry mix to wet mix. Stir until just mixed, dont overmix. Fold in white chocolate chips if you want.
- Bake: Pour batter in pan and spread evenly. Bake for 25-30 minutes or until a toothpick shows a few moist crumbs.
- Cool and Serve: Let brownies cool for about 20 minutes. Lift out with parchment, slice, and enjoy.
Tips for Perfect Red Velvet Brownies
- Use good-quality cocoa powder for deeper flavor.
- Dont overbake or theyll turn cakey instead of fudgy.
- Try mix-ins like nuts or berries for a twist.
- Let them cool fully before cutting so slices look clean.
Popular Variations of Red Velvet Brownies
- Red Velvet Cheesecake Brownies: Add a creamy cheesecake layer on top.
- Red Velvet Swirl Brownies: Swirl cream cheese into the batter for a marble effect.
- Gluten-Free Red Velvet Brownies: Swap regular flour for a gluten-free blend.
- Vegan Red Velvet Brownies: Use flax eggs and plant-based butter for a vegan option.
Serving Suggestions
- Top with a scoop of ice cream or a dollop of whipped cream.
- Drizzle with cream cheese frosting or a simple glaze.
- Pair with chocolate sauce or fresh fruit for contrast.
Storage and Shelf Life
- Store in an airtight container at room temp for up to 3 days.
- Refrigerate for up to a week or freeze for up to 3 months.
- Warm in the microwave for a few seconds before eating for that fresh-baked feel.
FAQs
What gives red velvet brownies their color?
It’s mostly red food coloring that makes them bright red. Cocoa powder and buttermilk also help a bit, but food coloring makes it pop.
Can I make red velvet brownies without food coloring?
Yes, you can skip it but the color will be more chocolate brown. You could use beetroot powder for a natural red tint.
How do I know when red velvet brownies are done?
Stick a toothpick in the center. If it comes out with a few moist crumbs, they’re perfect. If its clean, they may be overbaked and dry.
What is the difference between red velvet brownies and regular brownies?
Red velvet brownies have buttermilk and vanilla in addition to cocoa powder, giving them a slight tang and extra depth. They’re fudgier than most regular brownies.
Can I freeze red velvet brownies?
Yeah, just wrap each square in plastic wrap and put in a freezer bag. Thaw at room temp or zap in the microwave for a few seconds.
How can I make my red velvet brownies extra fudgy?
Try using more butter or less flour, or bake for a minute or two less. Adding melted chocolate can also boost fudginess.
Conclusion
Red velvet brownies are a fun and tasty way to mix up your baking routine. With their striking color and balanced flavors of cocoa, buttermilk and vanilla, they’ll impress everyone. Give this recipe a try and play around with mix-ins till you find your perfect batch. Happy baking!
red velvet brownies
Equipment
- 1 9x13 inch baking pan
- 1 mixing bowls
- 1 electric mixer or whisk
- 1 rubber spatula
- 1 measuring cups and spoons
- 1 baking parchment paper
- 1 cooling rack
Ingredients
- 1 cup unsalted butter, softened
- 2 cups granulated sugar
- 4 large eggs
- 1 tablespoon vanilla extract
- 1 ½ cups all-purpose flour
- 1 cup unsweetened cocoa powder
- 1 teaspoon baking powder
- 1 teaspoon baking soda
- ½ teaspoon salt
- 1 tablespoon red food coloring
- ½ cup buttermilk
- 8 oz cream cheese, softened For Cream Cheese Frosting
- ½ cup unsalted butter, softened For Cream Cheese Frosting
- 4 cups powdered sugar For Cream Cheese Frosting
- 1 teaspoon vanilla extract For Cream Cheese Frosting
Instructions
- Preheat your oven to 350°F (175°C). Grease and line the baking pan with parchment paper for easy removal.
- In a large mixing bowl, cream together the softened butter and granulated sugar using an electric mixer until light and fluffy.
- Add the eggs one at a time, mixing well after each addition, then stir in the vanilla extract.
- In a separate bowl, whisk together the flour, cocoa powder, baking powder, baking soda, and salt.
- Gradually add the dry ingredients to the wet mixture, alternating with the buttermilk, and mix until fully combined.
- Stir in the red food coloring until the batter is evenly colored.
- Pour the brownie batter into the prepared baking pan, spreading it evenly.
- Bake in the preheated oven for 30 minutes or until a toothpick inserted in the center comes out clean.
- Allow brownies to cool completely in the pan on a wire rack.
- For the cream cheese frosting, beat the softened cream cheese and butter together until smooth.
- Gradually mix in the powdered sugar and vanilla extract until creamy.
- Once the brownies are completely cooled, spread the cream cheese frosting on top.
- Cut into 12 pieces and serve.
Leave a Reply