
Spring cracks out of winter and suddenly the world feels brighter. Easter pops up and brings a colorful celebration about renewal, family and joy. People do stuff like egg hunts, feast on special dinners, and gather with loved ones. One of the best ways to catch that Easter mood is by building your own gingerbread house. It's yummy to eat and fun to decorate, even if the walls sometimes droop.
The point of this article is to show you how your gonna make a cool Easter gingerbread house. It's a project that could get the whole familee working together, laughing and maybe fighting a little over who gets the last jellybean. I'll cover why these houses are so neat, what ingredients you'll need and step-by-step instructions. By the end, youll have a candy-covered house that looks pretty awesome and celebrates spring right.

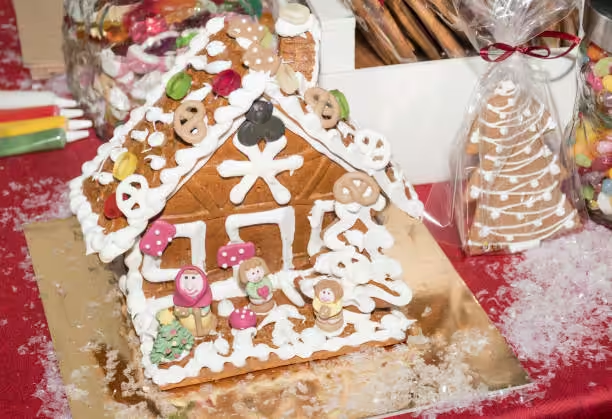
The Charm of Gingerbread Houses
The idea of building gingerbread houses started back in the early 19 century in Germany. People say it got really popular after the Grimm brothers published "Hansel and Gretel", where the kids find a house made of candy. At first they were just simple shapes but over time folks made them into fancy little castles with icing and lots of candy. Now we usually see them at Christmas but Easter is a cool time to mix it up.
Gingerbread houses kind of stand for warmth and home since families come together to make them. Though we often think of winter holidays, Easter versions let you play with pastel colours and flowers that show spring vibes. The candies and icing in soft pinks and yellows remind us of new life and hope.
Also, making gingerbread houses at Easter is a great way for everyone to hang out. Kids, parents, grandparents, they all can join. You build the walls, pipe icing, stick on jelly beans and maybe fight over the roof piece, but its all part of the fun. That stuff makes memories more than just eating sugar.
Essential Ingredients for Easter Gingerbread Houses
To build a strong and tasty Easter gingerbread house, you need good ingredients. Start with all-purpose flour, thats the base that holds everything together. Sugar makes it sweet, and dark molasses gives it that deep flavor and brown color. You also need spices—ginger, cinnamon, nutmeg—and baking soda so it rises.
After baking your dough, royal icing is the glue that holds the house up. Its made of powdered sugar, egg whites (or meringue powder), and a lil bit of water. It hardens quick so your walls dont collapse. Then get a bunch of edible decorations: pastel M&Ms, jelly beans, chocolate eggs, or any candy that fits your Easter theme.
If you want, swap items for allergies—gluten-free flour works fine instead of regular flour, and you can use sugar substitutes too. Check local stores or online for special stuff.
Step-by-Step Gingerbread House Recipe
Gingerbread Dough Recipe
Ingredients
- 4 cups all-purpose flour
- 1 cup granulated sugar
- 1 cup dark molasses
- 2 teaspoons ground ginger
- 2 teaspoons ground cinnamon
- 1 teaspoon ground nutmeg
- 1 teaspoon baking soda
- ½ teaspoon salt
Directions
- Mix the dough: In a big bowl, stir together the flour, sugar, spices, baking soda, and salt. In another bowl, mix the molasses with a bit of warm water so it blends easy. Then pour the molasses into the dry stuff and mix till a thick dough forms.
- Roll and cut: Split the dough in half and roll each part on a floured surface to about ¼ inch thick. Use cookie cutters or paper templates to cut out two side walls, a front, back, and a roof. Save extra scraps for fun decoration shapes.
- Bake the pieces: Heat oven to 350°F (175°C). Put the cut pieces on baking sheets lined with parchment or silpat. Bake for 12 to 15 minutes, till the edges look firm. Watch close so they dont overcook.
- Cool completely: Take the cookies out and move them to a wire rack. Let all the pieces cool and harden fully before building.
Royal Icing Recipe
Ingredients
- 3 cups powdered sugar
- 2 egg whites (or 2 tablespoons meringue powder mixed with 4 tablespoons water)
- 1 teaspoon lemon juice (optional)
Directions
- Make the icing: In a mixer, beat the powdered sugar and egg whites (or meringue mix) on high until the mix is shiny and stiff peaks form, about 5 minutes.
- Check consistency: If it feels too thick, add a few drops of water. It should be thick enough to pipe but thin enough to flow a bit when you flood surfaces.
Assembly Instructions for the Gingerbread House
- Build the walls: Put the two side walls upright on your base (a big piece of cardboard or plate). Use royal icing along the edges to glue them. Let it set a few minutes.
- Add front and back: Attach the front and back walls the same way. Press gently and let them dry for like 30 minutes so the house is stable.
- Decorate: Pipe more icing on edges, stick on candies, jelly beans, choc eggs, whatever you like. You can make a candy path or grassy yard with shredded coconut dyed green, get creative!
Creative Decoration Ideas for Easter Gingerbread Houses
Easter-Themed Ideas
Go wild with pastel colors—pink, yellow, baby blue—for icing and sprinkles. Place little candy eggs in window boxes and shape bunnies from marshmallows or fondant. These small touches can turn your gingerbread house into a spring scene.
Seasonal Edible Decorations
Here are some popular candies you could use:
- Mini chocolate eggs
- Colorful jelly beans
- Shredded coconut (dyed green to look like grass)
Customizing Your Gingerbread House
Let each person make their own spot on the house. Maybe one wall has stripes, the roof has polka dots. You could add names or dates, or shapes that remind you of family traditions.
Fun Activities to Enhance the Gingerbread House Experience
Family Bonding Activities
Throw a gingerbread party with cousins, friends or neighbours. Set up tables with dough stations, decorating spots, and icing piping stations so everyone gets involved. You could even have a friendly contest for the most creative design or the funniest fail.
Online Communities and Challenges
There are tons of groups on social media for baking fans. Join one, share pics of your house, and get inspired by others. Some places even host challenges or weekly themes, you might win a shoutout!
Storing and Maintaining Your Easter Gingerbread House
Best Practices for Storage
Keep your gingerbread house in a cool dry place away from sunlight or it might get soft. A big sealed box or plastic container works best. If its humid, the icing could melt so watch out.
How Long Does It Last?
Your house can look good for weeks if stored right but its tastiest in the first 7 to 10 days. After that, candies could get stale or start to sweat.
FAQs
Common Questions About Easter Gingerbread Houses
What is the best way to decorate an Easter gingerbread house?
Stick with a pastel color palette, pick candies that bring texture and fun shapes, and plan a basic design before you start so it looks neat.
Can I make the gingerbread house in advance? If so, how far in advance?
Yep. You can bake and cut the pieces weeks before, just store them in a sealed bag or box until you are ready to build.
What type of candies are best for decorating?
Bright candies like M&Ms, jelly beans, chocolate eggs and gummies all look great. Mixing shapes and sizes makes it more interesting.
How do I avoid a collapsed gingerbread house?
Use thick royal icing as glue, let each section set completely before adding more weight, and don’t build in humid weather.
Is it safe to eat an Easter gingerbread house after a certain time?
If you stored it right, it should be safe for a couple of weeks. But for best flavor and texture, eat it within ten days.
Can children help with making and decorating gingerbread houses?
Yeah, kids can help with almost everything—rolling dough, cutting shapes, piping icing, sticking on candies. It’s how they learn and have a blast.
Conclusion
Making an Easter gingerbread house mixes creativity, cooking, and family time into one fun project. Its a great way to welcome spring, share laughs, and end up with a sweet center piece you can eat. Whether you snap pics for social media or keep it on display in your home, this craft will bring back happy memories every time.
References
For more tips and pictures of gingerbread houses, check out baking blogs, cooking forums, or some holiday cookbooks at your library.

easter gingerbread house
Equipment
- 1 mixing bowls
- 1 electric mixer optional
- 1 rolling pin
- 2 baking sheets
- 1 parchment paper
- 1 cookie cutters or templates
- 1 oven
- 1 cooling rack
- 1 decorative piping bags
- 1 scissors
Ingredients
- 4 cups all-purpose flour
- 1 tablespoon ground ginger
- 1 tablespoon ground cinnamon
- 1 teaspoon ground cloves
- 1 teaspoon baking soda
- ½ teaspoon salt
- 1 cup unsalted butter, softened
- 1 cup brown sugar, packed
- 1 large egg
- ½ cup molasses
- 1 teaspoon vanilla extract
- Royal icing for assembly and decoration
- Assorted candies such as gumdrops, jellybeans, chocolate eggs, etc.
Instructions
- Preheat the oven to 350°F (175°C). Line baking sheets with parchment paper.
- In a large bowl, whisk together the flour, ginger, cinnamon, cloves, baking soda, and salt; set aside.
- In another bowl, cream the butter and brown sugar together using an electric mixer until light and fluffy, about 2-3 minutes.
- Beat in the egg, molasses, and vanilla extract until well combined.
- Gradually add the dry mixture to the wet ingredients, mixing until a dough forms.
- Divide the dough into halves, wrap each in plastic wrap, and refrigerate for at least 30 minutes.
- Once chilled, roll out the dough on a floured surface to about ¼ inch thick. Use cookie cutters or templates to cut out the shapes for the house (front, back, sides, and roof).
- Place the cutouts onto the prepared baking sheets and bake for 10-12 minutes, or until firm. Let the pieces cool completely on a cooling rack.
- Prepare royal icing according to package instructions or make your own by beating egg whites and powdered sugar until stiff peaks form.
- Assemble the gingerbread house by applying royal icing to the edges of the pieces and connecting them. Hold in place for a few seconds until set.
- Once assembled, use the royal icing as glue to attach the assorted candies for decoration. Be creative with your designs!
- Allow the assembled house to dry completely before displaying.


Leave a Reply