
The pot lid rattles and you know dinner is almost ready. You spot the steam sneaking out, the float valve doing its thing, and you sense that satisfying broth depth buildin' in the cooker. It's that moment where your stomach starts rumbling, and the smell hits you just right.
Meanwhile, you remember how this tender recipe's a total crowd-pleaser. It's kinda that comfort food that reminds you of home but with a crispy twist that you just can't get from a regular pan. You kinda can’t wait to plate it up.
Gotta admit, the wait feels kinda short when you realize the slow release is part of the secret here. That careful pressure drop keeps the tenders juicy and full-flavored. And hey, once the baking’s done, you push the quick release to finish things off crispy and delish.
Why Your Cooker Beats Every Other Pot
- You can lock in flavors with that sealing ring, keeping everything moist inside.
- The float valve tells you when pressure’s just right so you don’t overcook stuff.
- Broth depth is easy to control, makin’ juicy chicken tenders every time.
- Quick release means you get crispy skin super fast once cooking is done.
- It’s way faster than waiting with a stove or oven alone.
- Plus, you don't gotta babysit it; just set, seal, and chill until dinnertime.
All the Pieces for This Meal
- 1.3lb / 600g Chicken Tenders or Chicken Breast sliced into strips and at room temp. You gotta do room temp 'cause cold chicken won’t cook evenly under pressure.
- ⅓ cup / 50g Flour. It’s the base to get that first layer on the nuggets.
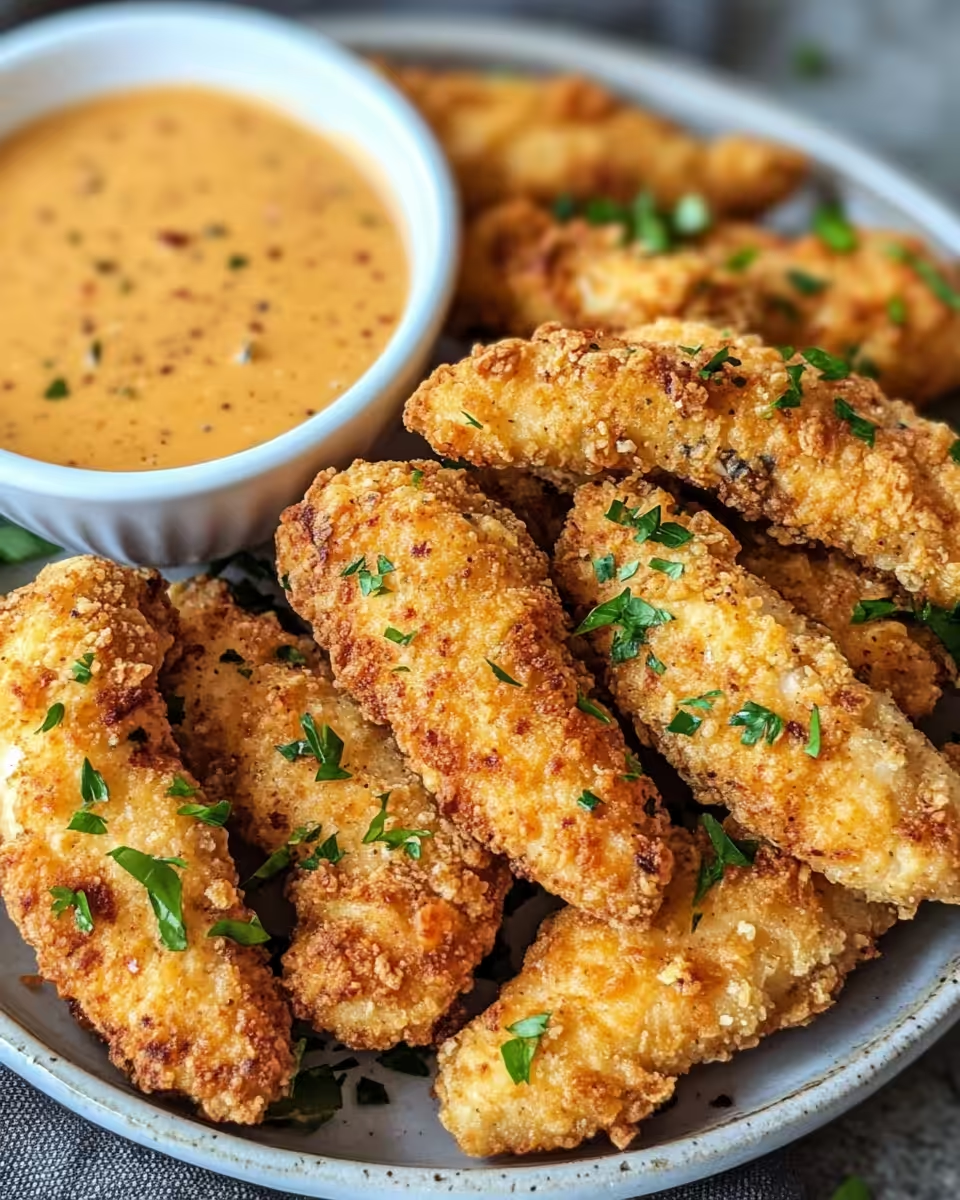
- 1 ¼ cups / 75g Panko Breadcrumbs. These give you the extra crisp texture you want.
- 1 heaped tablespoon Butter. Adds richness and helps toast the panko real nice.
- 1oz / 30g freshly grated Parmesan. Trust me, this cheese adds a kinda salty punch that makes you wanna go back for more.
- 1 Egg, beaten — the glue that holds everything together.
- 2 tablespoon Milk. Thins the egg so the coating sticks better.
- Spices: 1 teaspoon each Paprika and Salt, ¼ teaspoon each Onion Powder, Garlic Powder, Black Pepper, and a little ⅛ teaspoon Cayenne Pepper to bring mild heat but you can tweak that.
- Oil Spray. Helps crisp up the crust when you bake it later.
The Full Pressure Cooker Journey

First, you preheat the oven to 200C/390F or 180C/350F if you use fan convection. Line a baking tray with parchment or put a wire rack over a baking sheet — this helps the tenders crisp real good.
Next, melt your butter in a skillet over medium heat. Add the panko breadcrumbs and toast ‘em, stirring constantly so they turn golden brown. Then pop them off the heat to cool.
Mix flour with paprika, salt, onion powder, garlic powder, black pepper, and cayenne in one shallow bowl.
In a second bowl, whisk together egg and milk until smooth. This keeps your breading sticky and perfect.
Combine the toasted panko and Parmesan in a third bowl. This cheesy breadcrumb mix is the star of your crispy coating.
Dredge each chicken strip first in the flour mix, then dip in egg, and finally coat well with the panko-Parmesan mix. Press gently so it sticks tight.
Place your coated chicken tenders on the prepared tray or rack, spacing them out so they’re not touching. This helps air flow and keeps them crisp.
Bake for 25 to 30 minutes or until your tenders are golden and cooked through. Flip ‘em halfway if you don’t use a rack. Once done, remove from oven and let rest a couple minutes before diving in.
Easy Tweaks That Make Life Simple
Sometimes you gotta save time so try these shortcuts. First, toast your panko breadcrumbs ahead of time and stash ‘em in a jar. They stay crunchy and ready for the next round.
If you’re in a rush, you can skip the flour step but just know your coating might not stick as well. Egg and breadcrumbs alone still work pretty good.
Finally, swap butter for olive oil if you prefer. It gives a slightly different flavor but still toasts those crumbs just right. Plus, it’s easy to spray on your tray for baking.
What It Tastes Like Fresh From the Pot
The first bite's all crunchy goodness. Your teeth break into that crispy panko mixed with salty Parmesan, making a perfect crust.
Inside, the chicken stays juicy, tender, and so flavorful from that paprika and spice blend. You spot all the little tastes working together.
The butter toasted crumbs kinda melt in your mouth but still have that satisfying crunch you expect from good chicken tenders.
It’s comfort food with a twist— crunchy outside, soft inside, and just a little kick from cayenne that wakes up your taste buds.

Your Leftover Strategy Guide
Got some leftovers? No worries. The fridge is your best buddy. Cool tenders in an airtight container and eat within 3 days for best taste.
If you wanna freeze, wrap each tender in parchment then place in a freezer bag. They’ll last up to 2 months. Thaw overnight in fridge before reheating.
For reheating, oven or toaster oven is your best bet to keep that crunch. Microwave works in a pinch but it makes tenders kinda soggy.
Your Most Asked Questions Answered
- Q What’s broth depth and why’s it important here?
A Broth depth means the amount of liquid in the cooker. Too little, and stuff burns. Too much, and your tenders steam instead of crisp. You want just enough so chicken cooks right. - Q Can I use frozen chicken tenders?
A Frozen chicken tends to add cooking time. It’s better if you thaw to room temp so they cook evenly in pressure cooker. - Q What’s the sealing ring for?
A It’s the silicone ring that seals the lid so pressure builds inside. Gotta check it’s in place or cooker won’t pressurize right. - Q How does quick release work?
A Quick release vents steam fast when cooking’s done so you can open the lid. Use it to keep the tenders crisp and stop cooking fast. - Q Why flip halfway during baking?
A Flipping lets tenders crisp evenly on both sides, especially if you don’t have a wire rack to circulate air. - Q Can I add other spices?
A Sure! Feel free to mix in whatever you like but stick close to this base so flavors don’t get lost.

EXTRA Crispy Baked Chicken Tenders
Equipment
- 1 Baking Tray with Rack
- 1 Skillet
- 3 Mixing bowls
Ingredients
Main Ingredients
- 600 g Chicken Tenders or sliced chicken breast at room temp
- 50 g Flour
- 75 g Panko Breadcrumbs
- 1 tablespoon Butter heaped
- 30 g Parmesan freshly grated
- 1 Egg beaten
- 2 tablespoon Milk
- 1 teaspoon Paprika
- 1 teaspoon Salt
- ¼ teaspoon Onion Powder
- ¼ teaspoon Garlic Powder
- ¼ teaspoon Black Pepper
- ⅛ teaspoon Cayenne Pepper optional
- Oil Spray for baking
Instructions
Instructions
- Preheat oven to 200C/390F or 180C/350F fan. Line baking tray with parchment or place wire rack on tray.
- Melt butter in skillet over medium heat. Add panko and toast until golden, then remove from heat to cool.
- In one bowl, combine flour with paprika, salt, onion powder, garlic powder, black pepper, and cayenne.
- In second bowl, whisk egg and milk until smooth.
- In third bowl, mix toasted panko with grated Parmesan.
- Dredge each chicken strip in flour mix, then dip in egg, then coat in panko-Parmesan. Press crumbs to stick.
- Arrange coated tenders on tray or rack without touching. Spray lightly with oil.
- Bake 25–30 minutes until golden and cooked through. Flip halfway if not using a rack.
- Remove from oven and let rest briefly before serving.


Leave a Reply