

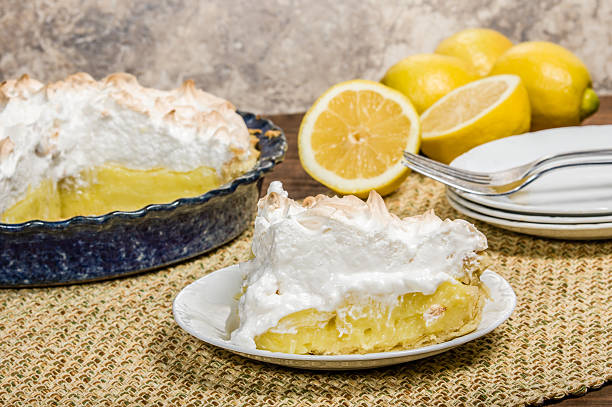
On a warm summer afternoon, the kitchen smelled like fresh lemons and sugar as Grandma pulled her lemon meringue pie out of the oven. The crust was golden, the filling tangy, and the meringue piled up like soft clouds. It always been one of my favorite treats because it mixes a bright burst of lemon flavor with a fluffy sweet top that just melts in your mouth.
History of Lemon Meringue Pie
The story of lemon meringue pie goes way back to the 19th century in Europe, especialy France. Folks there first whipped up sugar and egg whites to make meringue, then paired it with fruit tarts. When lemons got added to the mix, people loved that tart and sweet combo. By the time it crossed the ocean to America, it was already a big hit in homes and bakeries.
Over the years, every family put its own spin on the recipe. Some used extra sugar, some fiddled with the meringue peaks, and others even mixed in berries or different citrus fruits. That’s how Grandma ended up with her own special version that we all know and love today.
For many households, a grandmother’s recipe is like a treasure chest of stories. Recipes get passed down, telling us about family gatherings, holiday dinners, or lazy afternoons when everyone chatted around the kitchen table. Grandma’s pie isn’t just dessert—it’s a slice of history.
Why Grandma's Recipe is Special
What makes Grandma's lemon meringue pie special isn’t just the taste, but the way she bakes it. Every ingredient seems to have a story—like the bright yellow lemons that scream summer, or the eggs that turn into clouds of meringue. It’s all done with lots of care and a hint of grandma’s magic touch.
Her technique matters too. She knew exactly when the meringue peaks were ready and how long the lemon filling needed to thicken before it set just right. It’s those little tricks she never wrote down that give her pie its uniqe charm.
Plus, baking the pie turns the kitchen into a place full of laughter and memories. The zesty lemon smell mixing with sweet sugar, the sound of whipped egg whites, and the warm oven timer ticking—everything feels like home.
Ingredients for Grandma’s Lemon Meringue Pie
To make Grandma’s lemon meringue pie, you don’t need a ton of fancy stuff—just simple, good-quality ingredients.
For the Crust
- All-purpose flour: Gives the crust structure.
- Unsalted butter: Makes it rich and flaky.
- Sugar: Adds a little sweetness and helps it brown.
- Cold water: Holds everything together and keeps the crust flaky.
For the Filling
- Fresh lemons (juice and zest): The main event—tangy and bright.
- Sugar: Balances the sour lemons.
- Cornstarch: Thicks the filling so it isn’t runny.
- Egg yolks: Make it creamy and smooth.
- Butter: Adds richness and flavor depth.
For the Meringue
- Egg whites: The base of the airy meringue.
- Cream of tartar: Keeps the egg whites stable.
- Sugar: Sweetens the meringue and makes it glossy.
Tip: Using organic lemons and free-range eggs can really up your pie game. Fresh ingredients make a big diffrence.
Step-by-Step Directions
Preparation Steps
1. Making the Pie Crust
Mix the flour, sugar, and cold butter in a bowl until it looks like coarse crumbs. Slowly add cold water and mix until the dough comes together. Wrap it in plastic and chill for 30 minutes.
After chilling, roll out the dough on a floured surface to about ⅛ inch thick. Fit it into your pie pan, trim the edges, and prick the bottom with a fork so it won’t bubble up. Bake at 350°F (175°C) for 15 minutes or until it’s light golden.
2. Preparing the Lemon Filling
In a saucepan, whisk together lemon juice, zest, sugar, and cornstarch over medium heat. Once it starts to thicken, slowly stir in the egg yolks so they don’t scramble. Keep cooking until it’s like pudding, then take off the heat and stir in the butter until melted. Let it cool a bit before pouring into the crust.
3. Making the Meringue
In a clean, dry bowl, whip the egg whites until they form soft peaks. Gradually add sugar while whipping until you get stiff, glossy peaks. Mix in cream of tartar, then spread the meringue over the lemon filling, pressing it to the crust edges so it won’t shrink.
4. Baking the Pie
Bake at 350°F (175°C) for 10–15 minutes or until the meringue is golden brown. Keep an eye on it so it doesn’t burn. Let the pie cool all the way before slicing so the filling can set up nice.
Tips and Tricks for Success
- Use fresh ingredients: Fresh lemons and eggs taste way better.
- Clean tools: Make sure bowls and beaters are grease-free for perfect meringue.
- Add lemon zest to the meringue: Gives extra flavor.
- Seal the meringue to the crust: Stops it from weeping.
- Store in the fridge: Eat within 1–2 days for best taste.
Variations on Grandma's Recipe
- Graham cracker crust: Try this for a different crunch.
- Other citrus fruits: Use lime or orange instead of lemon.
- Sweetener swaps: Honey or maple syrup work too.
- Mini pies: Make small ones in muffin tins for a fun twist.
Pairing Suggestions
- Drinks: Iced tea, sparkling water, or a light citrus cocktail go great.
- Side dishes: A simple fruit salad or green salad with citrus dressing.
- Presentation: Top with whipped cream, powdered sugar, or lemon slices and mint leaves.
Conclusion
Grandma's lemon meringue pie is more than just dessert—it’s a piece of family tradition. Baking it brings back memories and makes new ones at the same time. So gather your ingredients, call up your cousins, and share a slice of fruity, fluffy goodness that has been loved for generations.
FAQs
Frequently Asked Questions
What makes Grandma's lemon meringue pie different?
Her special tricks and little tweaks that got passed down make it one-of-a-kind and full of love.
Can I make the pie ahead of time?
You can prep the crust and filling a day before, but add the meringue just before serving so it stays fluffy.
What is the best way to store lemon meringue pie?
Keep it in the fridge, loosely covered, and eat within two days for the best taste.
How do I prevent the meringue from weeping?
Whip egg whites well, add sugar slowly, and seal the edges of the meringue to the filling.
Can I substitute ingredients for dietary restrictions?
Yes—gluten-free flour, dairy-free butter, or alternative sweeteners all work pretty well, just tweak as needed.
Final Notes
We hope this look at Grandma's lemon meringue pie inspires you to bake, share, and make your own memories. Family recipes like this one help keep traditions alive and sweeten every gathering!

Grandma's Lemon Meringue Pie
Equipment
- 1 9-inch pie pan
- 1 medium mixing bowl
- 1 large mixing bowl
- 1 whisk
- 1 electric mixer if available
- 1 saucepan
- 1 set measuring cups and spoons
- 1 rubber spatula
Ingredients
- 1 pre-made 9-inch pie crust
- 1 cup granulated sugar
- 2 tablespoons cornstarch
- ¼ teaspoon salt
- 1 cup water
- 3 large eggs (separated into yolks and whites)
- ½ cup fresh lemon juice
- Zest of 1 lemon
- 2 tablespoons unsalted butter
- ¼ teaspoon cream of tartar
- 6 tablespoons granulated sugar (for meringue)
Instructions
- Preheat your oven to 350°F (175°C).
- In a medium saucepan, combine 1 cup of sugar, cornstarch, and salt. Gradually add 1 cup of water while whisking until smooth.
- Cook the mixture over medium heat, stirring constantly until it comes to a boil. Allow it to boil for 1 minute, then remove it from heat.
- In a small bowl, beat the egg yolks lightly. Gradually whisk in some of the hot mixture into the yolks to temper them, then pour the yolk mixture back into the saucepan.
- Return the saucepan to the heat and cook for an additional 2 minutes, stirring constantly. Remove from heat and stir in lemon juice, lemon zest, and butter until combined.
- Pour the lemon filling into the pre-baked pie crust and spread evenly.
- In a large mixing bowl, beat the egg whites with cream of tartar until soft peaks form. Gradually add 6 tablespoons of sugar and continue beating until stiff peaks form.
- Spread the meringue over the lemon filling, making sure to seal the edges to prevent shrinking.
- Bake in the preheated oven for about 10-12 minutes, or until the meringue is golden brown.
- Allow the pie to cool at room temperature for at least 2 hours before slicing and serving.


Leave a Reply