
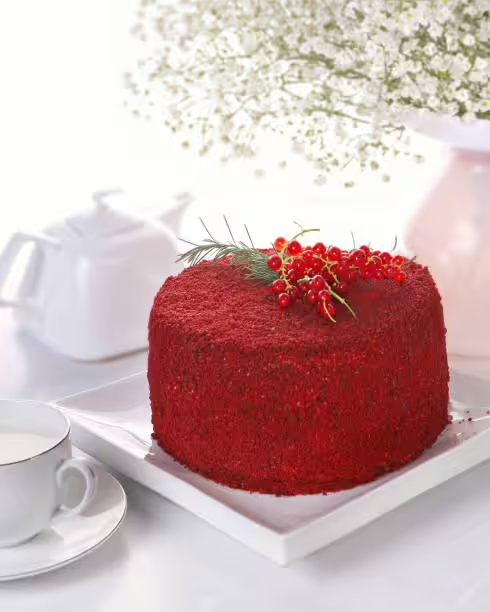
Red velvet cake with it's deep crimion colour and super soft texture is totally a favorite at parties or even just for a random snack. It kinda tastes like chocolate but also has a tangy bite from buttermilk that just makes your mouth water, and when you top it with cream cheese frosting it really stands out on any table at birthdays, weddings, or just an ordinary day.
Having a good recipe is really important if you wanna make this famous cake correctly. These days theres so many versions and tips online you might get confuse trying to follow them all. A solid recipe will help you get the same tasty cake each time, and let bakers of all skill level feel proud when they bake a red velvet cake that could match the ones from fancy bakeries.
In this guid you'll find stuff like the history of red velvet cake, why it's different, and a step-by-step how-to that shows you every thing to make a perfect cake at home. Whether your already good at baking or just starting out, this resource will give you the know-how and tricks to whip up this classic dessert. Get ready to dive into the delish world of red velvit cake!

History of Red Velvet Cake
People think red velvet cake started back in the early 1900s in the Southern United States. It poped up around the Victorian era, when bakers began using more coco powder in desserts. Mixing things like buttermilk and cocoa powder caused a slight red hue without food colouring, but it didnt really blow up until the 1920s when a Texan cookbook published a recipe that caught everyones attention.
By the 1930s, red velvet cake was showing up in ads and cookbooks under the name "red velvet," and even fancy restaurants started serving it cause it looked so extra. Then food coloring got added to make that red colour brighter, so home bakers and pastry chefs could be sure their cakes always looked the same. This only made it more popular in kitchens across the country.
Red velvet cake also has a big place in Southern food traditions. It was often made for special days like weddings or birthdays, symbolizing celebration and sweet pampering. By the year 2000, the cake spread all over the US and even the world, turning into a national fav and you can now find it in bakeries almost everywhere. Today, its classic taste and bold look still win hearts of new bakers and cake lovers alike.
Understanding Red Velvet Cake
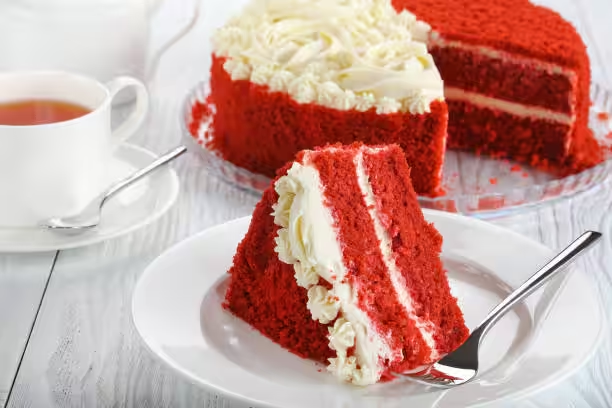
When you first see red velvet cake, the colour jumps out at you, but the taste is just as special. The key ingrediants are all-purpose floud, cocoa powda, sugar, eggs, oil or butter, and buttermilk. Buttermilk is real important cause it gives a slight tang that balances the sweet and helps keep the cake moist.
The kind of cocoa powder you use is usually a mild one so the cake tastes chocolatey but not too strong. That way you get that mix of chocolate undertones and a little sour kick from the buttermilk. Most bakers also add red food colouring to make the red stand out more, so everybody knows its red velvet.
The texture is what really makes red velvet cake feel special. All these stuff working together give you a soft crumb and a super velvety mouthfeel that so many people love. Because of this combo, red velvet cake has earned its spot as one of the most-loved desserts out there.
Recipe Overview
Now that you know some history and why red velvet cake is so cool, lets get to the recipe. A good recipe will walk you through every step so you can bake a fantastic red velvet cake in your own kitchen. Before you start, here some tips to help:
- Gather all ingrediants and tools first so you dont have to stop in the middle.
- Preheat your oven and grease or line your cake pans.
- Read the whole recipe one time, so you know whats coming up.
Detailed Red Velvet Cake Recipe
Ingredients
To whip up a classic red velvet cake, you need this:
- For the cake:
- 2 ½ cups all-purpose floud
- 1 ½ cups granulated sugar
- 1 cup vegetable oil
- 1 cup buttermilk, room temp
- 3 large eggs, room temp
- 2 tablespoon unsweetened cocoa powda
- 1 teaspoon baking soda
- 1 teaspoon white vinegar
- 1 teaspoon vanilla extract
- 1–2 teaspoon red food colouring (depending on how red you want it)
- For the cream cheese frosting:
- 1 cup unsalted butter, softened
- 8 oz cream cheese, softened
- 4 cups powdered sugar
- 1 teaspoon vanilla extract
Note: If you dont have buttermilk, you can mix regular milk with a bit of vinegar or lemon juice. Or try gluten-free flour blends if someone needs it.
Directions
- Prepping the Oven and Pans: Preheat the oven to 350°F (175°C). Grease two 9-inch round pans and line bottoms with parchment paper to make removing easy.
- Making the Cake Batter:
- In a large bowl, sift together flour, cocoa powda, baking soda, and salt.
- In another bowl, whisk sugar, oil, buttermilk, eggs, vanilla extract, and red food colouring.
- Slowly add the dry mix to the wet mix, stirring until almost combined—dont overmix.
- Stir in the vinegar at the end, it will react with baking soda and help it get fluffy.
- Baking the Cake: Divide batter evenly between the pans. Bake 25–30 minutes or until a toothpick in the center comes out clean.
- Cooling the Cake: Let cakes cool in pans for about 10 minutes, then move them to a rack to cool completely. This helps with frosting later.
- Making the Frosting:
- Beat butter and cream cheese in a bowl until smooth.
- Add powdered sugar and vanilla, and beat until its light and fluffy.
- Assembling the Cake: When cakes are cool, place one layer on a plate. Spread a layer of frosting, then top with the second layer. Frost sides and top. You can add sprinkles or berries to make it look extra pretty.
Baking Tips
To make sure your red velvet cake turns out great, keep these in mind:
- Measure ingredients right to avoid a weird texture.
- Dont overmix batter or cake could be tough.
- Keep leftover cake in an airtight container in fridge up to 3 days—or freeze for more time.
- Pair it with coffee or tea for a yummy flavour combo.
Variations on Red Velvet Cake
Though the classic red velvet cake is awesome, you can switch it up:
- Gluten-free red velvet cake: Use gluten-free flour blends instead of regular flour.
- Vegan red velvet cake: Try flax eggs, plant milk, and vegan butter for a vegan treat.
- Red velvet cake cupcakes: Turn the cake mix into cupcakes for smaller servings.
- Red velvet cake bars: Bake batter in a pan and cut into bars for a different style.
FAQs
What is the origin of red velvet cake?
It started in early 1900s in the Southern US and got more popular in the 1920s and 1930s.
Can I use natural cocoa powder instead of Dutch-processed for red velvet?
You can, but the taste and colour might not be the same. Dutch-processed powder gives a milder taste and darker colour.
How do I prevent my red velvet cake from being dry?
Dont overbake and use buttermilk for moisture. Check for doneness a few minutes before the time is up.
Why does red velvet cake taste like chocolate?
It gets its mild chocolate flavour from the cocoa powder, but the buttermilk adds tanginess.
What can I use instead of buttermilk in a red velvet recipe?
Mix regular milk with a tablespoon of vinegar or lemon juice and let it sit for 5–10 minutes.
Conclusion
With its cool history, unique taste, and bright colour, red velvet cake is a total fav dessert. By following this detailed recipe and tips, you can wow your friends and family with your baking. Dont be scared to try different versions and show off your tasty creations!
red velvet cake recipe
Equipment
- 2 round cake pans (9-inch)
- multiple mixing bowls
- 1 electric mixer or whisk
- 1 set measuring cups and spoons
- 1 rubber spatula
- 1 cooling rack
- 1 sifter
- 1 plastic wrap
Ingredients
- 2 ½ cups all-purpose flour
- 1 ½ cups granulated sugar
- 1 cup vegetable oil
- 1 cup buttermilk, room temperature
- 2 large eggs
- 2 tablespoons red food coloring
- 1 teaspoon vanilla extract
- 1 teaspoon baking soda
- 1 teaspoon white vinegar
- 1 teaspoon salt
- 1 tablespoon unsweetened cocoa powder
- 8 ounces cream cheese, softened
- ½ cup unsalted butter, softened
- 4 cups powdered sugar
- 1 teaspoon vanilla extract
- 2-3 tablespoons milk (optional, for consistency)
Instructions
- Preheat the oven to 350°F (175°C). Grease and flour the two round cake pans.
- In a mixing bowl, combine the flour, sugar, cocoa powder, and salt. Mix well and set aside.
- In another bowl, add the vegetable oil, buttermilk, eggs, red food coloring, and vanilla extract. Whisk until fully combined.
- Gradually add the wet ingredients to the dry ingredients, mixing on medium speed until smooth.
- In a small bowl, combine the baking soda and vinegar. Add this mixture to the cake batter, mixing until just combined.
- Divide the batter evenly between the prepared cake pans and smooth the tops with a spatula.
- Bake in the preheated oven for 25-30 minutes, or until a toothpick inserted into the center comes out clean.
- Remove the cakes from the oven and allow them to cool in the pans for 10 minutes before transferring them to a cooling rack to cool completely.
- While the cakes are cooling, prepare the cream cheese frosting. In a mixing bowl, beat together the softened cream cheese and butter until creamy.
- Gradually add the powdered sugar and vanilla extract, mixing until the frosting is smooth and fluffy. Add milk as needed for desired consistency.
- Once the cakes are completely cooled, place one layer on a serving plate and spread a layer of frosting on top. Place the second layer on top and frost the top and sides of the cake.
- Optional: Decorate with sprinkles or additional decorations as desired.
Leave a Reply