
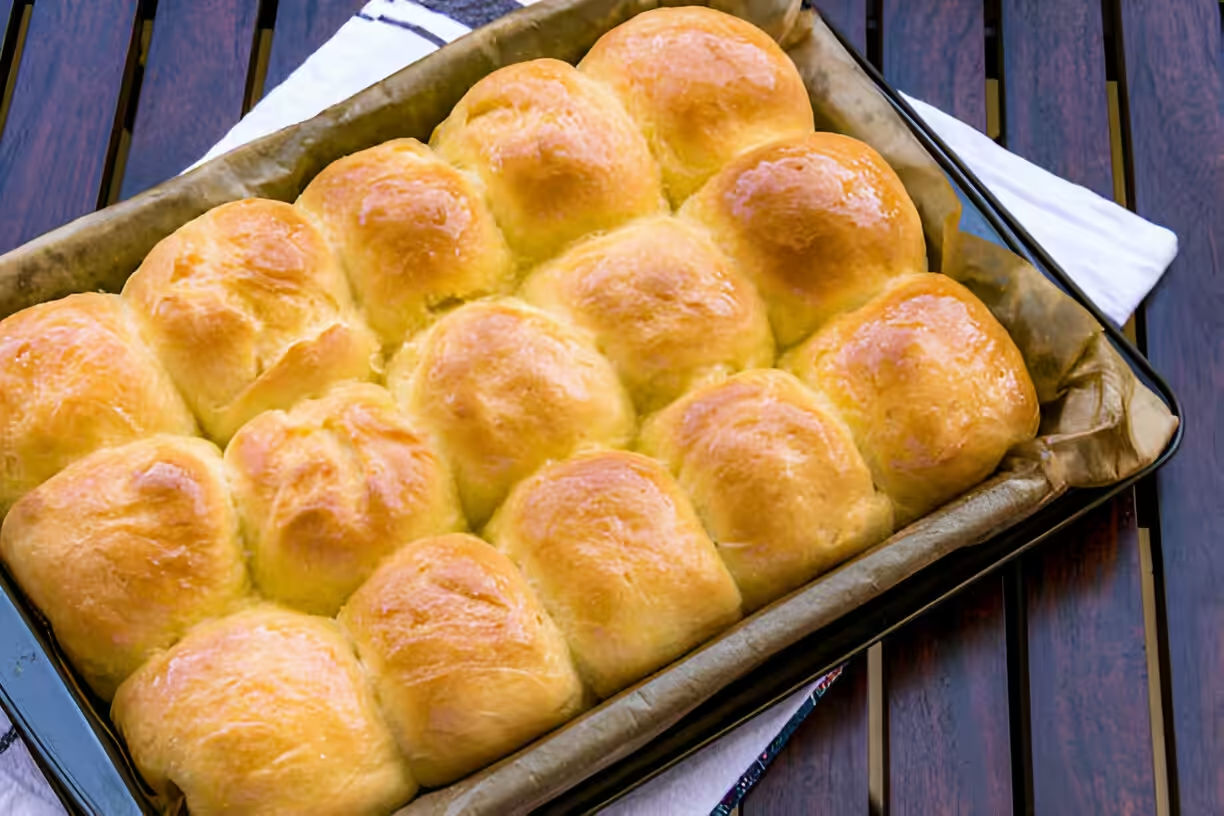
There’s just something warm about old fashioned yeast rolls that makes you feel at home. They smell amazing fresh from the oven and taste even better. People have been baking these rolls for years, mostly at family dinners and special parties. They’re light and fluffy, with a buttery flavor that kinda melts in your mouth. The yeast really does its magic thing, giving each bite a soft, tender feel you just can’t resist.
Baking old fashioned yeast rolls isn’t only about mixing ingredients. It’s a real experience that brings back memories. These rolls go great with soup or stew, or you can eat them by themselves with butter or jam. Whether you’re making them for a holiday meal, a simple dinner, or just a weekend snack, they’ll bring folks together around the table. Every roll you bake becomes part of those good times and warm moments.
What are Old Fashioned Yeast Rolls?
Old fashioned yeast rolls are a type of bread that lots of people have been making for generations. They started in different cultures and ended up as a favorite at family meals and celebrations. You’ll often see them on the table at holidays or birthday dinners because they’re the ultimate comfort food.
The best thing about these rolls is their light, fluffy texture and buttery taste. When the yeast does its work, simple ingredients turn into something soft and yummy. Each bite feels warm, making them a perfect side for any meal.
Why You Should Make Them
Making these rolls is more than just following steps. It’s like creating a little nostalgia. They match up well with soups, stews, or you can snack on them plain with a smear of butter or jam. When they’re on the table, people just feel happier.
Whether it’s a big holiday feast or a quick weekend treat, these rolls bring joy and good memories. Every batch you bake invites everyone to gather, share food, and enjoy some simple happiness.
Ingredients for Old Fashioned Yeast Rolls
To make these rolls turn out just right, you need a handful of basic ingredients. Each one has its job:
- Flour: Gives the rolls their shape and structure.
- Yeast: The little helper that makes the dough rise.
- Sugar: Feeds the yeast and adds a touch of sweetness.
- Salt: Brings out the flavors and strengthens the dough.
- Milk: Adds moisture and makes the dough richer.
- Eggs: Help bind everything together and add richness.
- Butter: Gives that tender crumb and buttery taste.
Knowing what each ingredient does helps you bake better rolls. Using good quality stuff will make a big difference in taste and texture.
Equipment Needed
Before you start baking, grab the tools you’ll need. Having the right gear makes everything easier:
- Mixing bowl: A large one for combining your ingredients.
- Measuring cups and spoons: To get measurements right every time.
- Dough whisk or stand mixer: Makes mixing and kneading faster.
- Baking sheet: Line it with parchment paper or grease it well.
- Kitchen towels: To cover the dough while it proves so it stays warm and moist.
Step-by-Step Recipe for Old Fashioned Yeast Rolls
4.1 Preparation Phase
First, set up your workspace. If you’re using active dry yeast, mix it with warm milk and a teaspoon of sugar. Let it sit for 5–10 minutes until it gets frothy—this means the yeast is alive. In another bowl, stir together flour, sugar, and salt. In a separate bowl, combine the yeast mix, eggs, milk, and melted butter. Pour the wet ingredients into the dry and mix until it forms a dough.
Turn the dough onto a floured surface and knead for about 8–10 minutes until it’s smooth and elastic. You can use a stand mixer with a dough hook if you want. Then, put the dough in a greased bowl, cover it with a kitchen towel, and let it rise in a warm spot until it doubles in size—about 1–2 hours.
4.2 Proofing the Dough
Proofing is an important step. After the dough has doubled, gently punch it down to let out the air. This helps the yeast develop more flavor. Shape the dough into a ball and let it proof again for 30 minutes, covered with a towel so it stays moist.
4.3 Shaping and Second Rise
Once it’s proofed, divide the dough into about 12–15 pieces. Roll each piece into a ball and place them on your prepared baking sheet, leaving space between them. Let the rolls rise again for 30–45 minutes. This second rise is what makes them super fluffy and light.
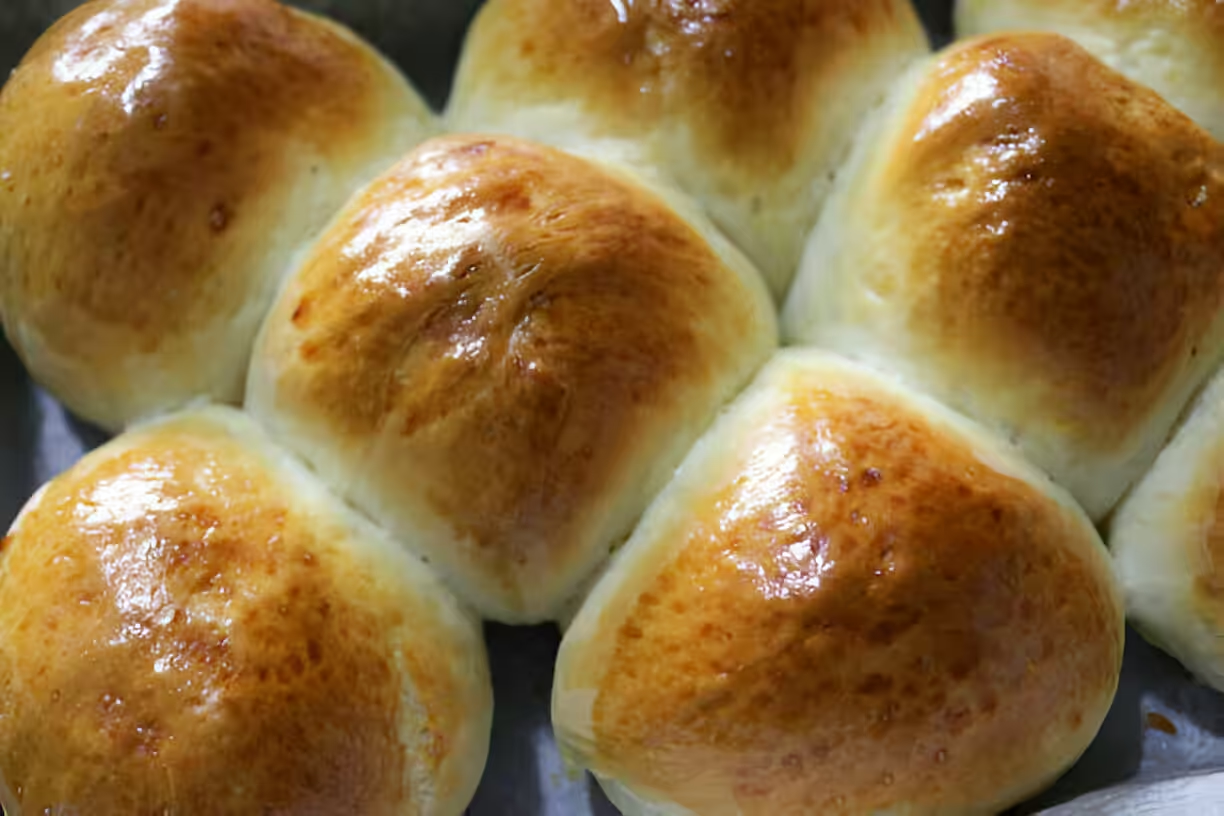
4.4 Baking and Serving
Preheat your oven to 350°F (175°C). Bake the rolls for 15–20 minutes, or until they’re golden brown. Tap the bottom; if it sounds hollow, they’re done. Cool them a bit on a wire rack before serving so they don’t fall apart. Enjoy warm, with butter, jam, or just plain.
Common Mistakes and Tips for Success
Baking these rolls is pretty simple, but here are some tips to avoid goof-ups:
- Overworking or underworking the dough: Knead until smooth and elastic. Too much kneading can make rolls tough.
- Temperature issues with yeast: Make sure liquids are warm, not too hot or too cold, or the yeast won’t work right.
- The importance of measuring flour accurately: Spoon flour into your cup and level it off. Too much flour makes dough dry and stiff.
- Tips for perfecting texture and flavor: Don’t rush the rise times. A slow, steady proof makes better flavor and fluffiness.
- Handling leftovers: Freeze extra rolls by wrapping them in plastic wrap and foil. They’ll keep up to three months.
Variations of Old Fashioned Yeast Rolls
These rolls are easy to tweak if you want to try different flavors. Here are some ideas:
Sweet Variations
- Cinnamon rolls: Roll out the dough, spread cinnamon sugar, then roll up and slice for a tasty breakfast treat.
- Honey butter rolls: Add honey to the dough for extra sweetness. Serve with honey butter.
Savory Variations
- Cheese-stuffed rolls: Fill each roll with cheese in the center for a melty surprise.
- Garlic herb rolls: Mix garlic and fresh herbs into the dough, and brush with garlic butter before serving.
Nutritional Information
Knowing what’s in your rolls can help if you’re watching your diet:
- Caloric content per roll: Around 150–200 calories each, depending on ingredients.
- Breakdown of macronutrients: About 25 g carbs, 4 g protein, and 6 g fat per roll.
- Healthier ingredient swaps: Use whole wheat flour for more fiber and cut back on sugar for a lighter version.
Storing and Reheating Old Fashioned Yeast Rolls
Store and reheat your rolls the right way to keep them fresh:
- Best methods for storing rolls: Keep them in an airtight container at room temp for up to two days. You can also refrigerate them to last longer.
- How to properly freeze rolls: After they’ve cooled, wrap each one in plastic wrap and foil, then put them in a freezer bag.
- Reheating tips while maintaining freshness: Thaw rolls overnight in the fridge, then heat them in a preheated oven at 350°F (175°C) for 8–10 minutes.
Frequently Asked Questions (FAQ)
Here are some common questions about old fashioned yeast rolls:
- What is the best type of yeast to use for rolls? Instant or active dry yeast both work fine and give good results.
- Can I make these yeast rolls ahead of time? Yes, you can shape the rolls and keep them in the fridge for up to 24 hours before baking.
- What if my yeast doesn't bubble? That might mean your yeast is dead or the liquid was the wrong temp. Check the date and temp.
- Can I substitute milk for water? You can, but milk adds more flavor and richness to the dough.
- How do I make my rolls fluffier? Let them rise long enough and use room-temp ingredients so the yeast can work well.
Conclusion
Baking old fashioned yeast rolls is fun and fills your home with cozy smells. They’re more than a simple side dish—they’re part of traditions and happy moments. Give this recipe a try, tweak it your way, and share warm rolls with the folks you love.

Old Fashioned Yeast Rolls
Equipment
- 1 large mixing bowl
- 1 measuring cups and spoons
- 1 whisk
- 1 wooden spoon or dough scraper
- 1 clean kitchen towel
- 1 baking sheet
- 1 oven
Ingredients
- 4 cups all-purpose flour plus more for dusting
- 1 packet active dry yeast (2 ¼ teaspoons)
- ¼ cup granulated sugar
- 1 teaspoon salt
- ½ cup whole milk
- ½ cup water
- ¼ cup unsalted butter melted, plus more for brushing
- 2 large eggs
Instructions
- In a large mixing bowl, combine 2 cups of flour, sugar, salt, and yeast. Whisk together until well mixed.
- In a small saucepan, heat the milk and water over low heat until warm (about 110°F or 43°C). Remove from heat.
- Add the warm milk mixture and melted butter to the dry ingredients. Stir until combined.
- Beat the eggs in a separate bowl, then add to the mixture and stir until smooth.
- Gradually add the remaining flour, 1 cup at a time, until a soft dough forms.
- Turn the dough out onto a lightly floured surface and knead for about 5-7 minutes until smooth and elastic.
- Place the dough in a greased bowl, cover with a clean kitchen towel, and let it rise in a warm place until doubled in size, about 1 hour.
- Punch down the risen dough and turn it out onto a floured surface. Divide the dough into 12 equal pieces and shape them into rolls.
- Place the rolls on a greased baking sheet, leaving space between each. Cover with a towel and let rise again for about 30 minutes, or until doubled.
- Preheat the oven to 375°F (190°C).
- Bake the rolls for 15-20 minutes or until golden brown. Brush with melted butter immediately after removing from the oven.
- Allow the rolls to cool slightly before serving.

Leave a Reply